This is a package for applying machine learning to medical notes in Hebrew.
This package extends the Hebrew Medical Entity Linking / Language Processing tool.
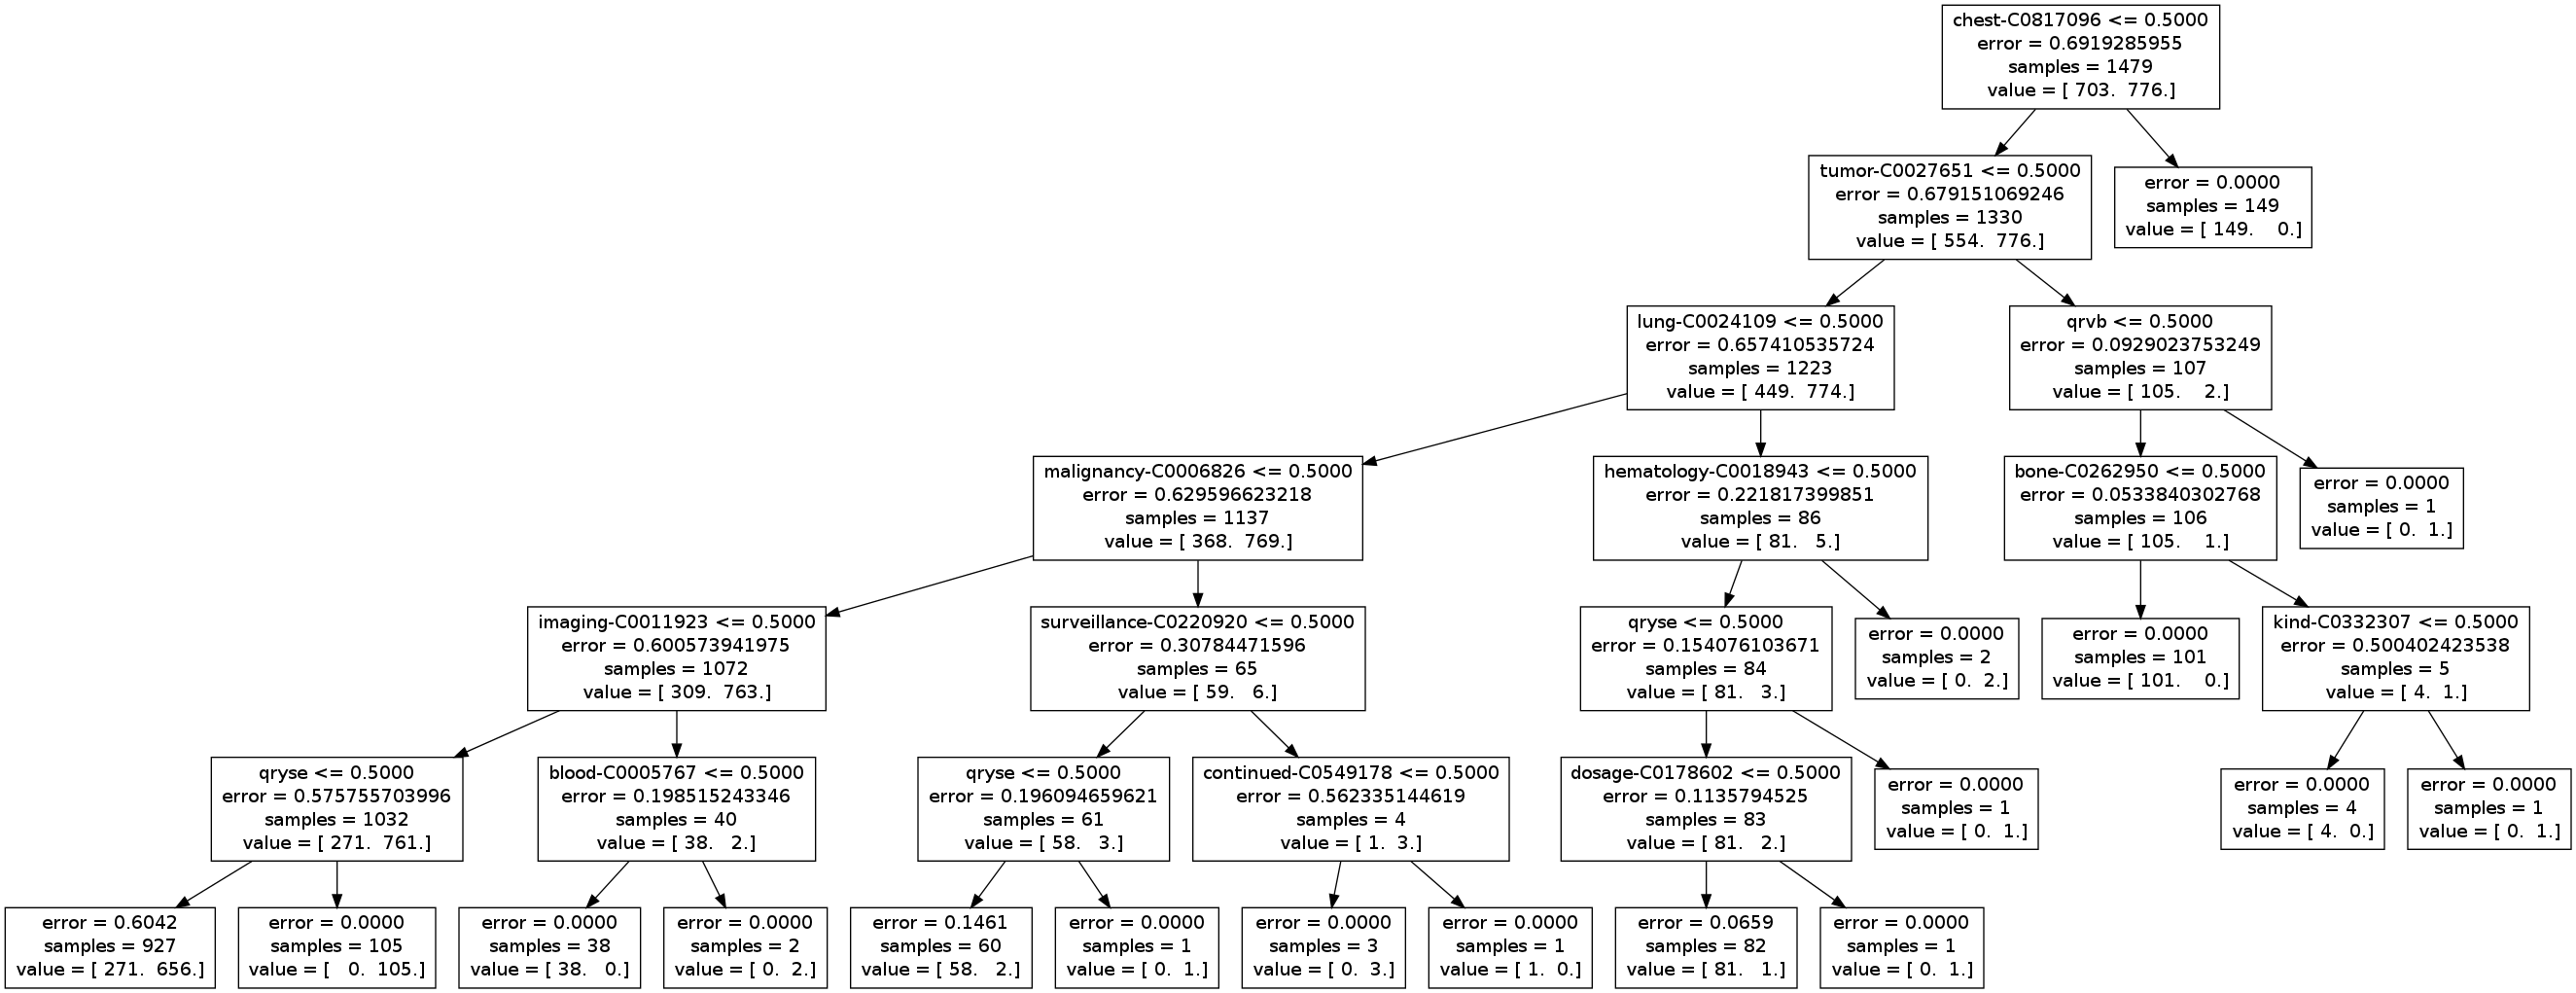
To use this package you will need to first use the aforementioned Entity Linking tool to annotate all of the notes. The default setting creates decision trees based on labeling of the medical notes (for example "Epilepsy" vs. "Not Epilepsy").
    BGU NLP - Medical Hebrew Machine Learning Suite is free software: you can redistribute it and/or modify
    it under the terms of the GNU General Public License as published by
    the Free Software Foundation, either version 3 of the License, or
    (at your option) any later version.

    This program is distributed in the hope that it will be useful,
    but WITHOUT ANY WARRANTY; without even the implied warranty of
    MERCHANTABILITY or FITNESS FOR A PARTICULAR PURPOSE.  See the
    GNU General Public License for more details.

    See the GNU General Public License.
BGU NLP - Medical Hebrew Machine Learning Suite.
The prerequisites are java 1.6 and python (it has been tested with Python 2.7) including scikit-learn.
1. Use the  Entity Linking tool to annotate each note using the plain-text output
2. Use it as a web service (we do not keep any logs) with the annotateMedicalWithWebService.py script.
3. If you cannot use the service, contact us for a local installation / secure service password.
The output of a file looks like this:
אני	:PRONOUN-MF,S,1:	הוא	B-NP	O
סובל	:VERB-M,S,A,BEINONI:	סבל	O	suffering-C0683278
מכאב	PREPOSITION:NOUN-M,S,CONST:	כאב	B-NP	pain-C0030193
ראש	:NOUN-M,S,ABS:	ראש	I-NP	head-C0018670
,	:PUNCUATION:	,	O	O
קוצר נשימה	:TERM:	קוצר נשימה	O	shortness of breath-C0013404
ומטופל	CONJ:NOUN-M,S,ABS:	מטופל	I-NP	patient-C0030705
באקמול	PREPOSITION:NOUN-M,S,ABS:	אקמול	B-NP	O
,	:PUNCUATION:	,	O	O
ונטולין	:PROPERNAME:	ונטולין	B-NP	salbutamol-C0001927
וtylenol	CONJ:PROPERNAME:	tylenol	B-NP	rxconso-202433-tylenol
.	:PUNCUATION:	.	O	O
For our classification example:
% python annotateMedicalWithWebService.py mlSample mlSampleAnnotated
% python phenotypeExtractorStep1.py [directory-name]The result is a file with possibe features named: [directory-name]-possibleFeatures
% python phenotypeExtractorStep1.py mlSampleAnnotatedWill create a feature file names mlSampleAnnotated-possibleFeatures
% python phenotypeExtractorStep2.py [directory-name]This creates 2 files: [directory-name]-featuresData and [directory-name]-featuresData-labels
% python phenotypeExtractorStep2.py mlSampleAnnotatedThis creates: mlSampleAnnotated-featuresData and mlSampleAnnotated-featuresData-labels .
% python classifyWithSK.py [directory-name]-featuresDataTo see the resulting decision trees you can use "dot"
%dot graph0 -Tpng -o graph0.pngFor our classification example:
% python classifyWithSK.py mlSampleAnnotated-featuresData
             precision    recall  f1-score   support

         -1       0.93      0.60      0.73        72
          1       0.75      0.97      0.85        92

avg / total       0.83      0.80      0.80       164

   ... (the default is running the classifier on 10 different data splits)

			 precision    recall  f1-score   support

         -1       0.97      0.66      0.78        87
          1       0.71      0.97      0.82        77

avg / total       0.85      0.80      0.80       164

0.831200365875

% dot graph9 -Tpng -o graph9.png
0.831200365875 is the average F-measure.
You can change the classifier to SVM in the configuration file (the "classifier" variable).
Try doing this with our example - the F-measure should rise to 0.88 (note that no visualization is available for SVM).